-
Your shopping cart is empty!
CATEGORIES MENU
Your shopping cart is empty!
The first step of pressure testing is to make sure that all of the PEX tubing is undamaged and properly fastened to the manifold. The next step would be checking the fitting and manifold connections to ensure they are properly secured. If there are any connections that look like they should be re-done, then do so. Once all these procedures are taken care of turn on the air compressor and check the pressure gauge so that it is rated at roughly 100 PSIG. Closely inspect every piece of tubing to witness if any air is seeping out, if so splice any faulty tubing to ensure that there is none.

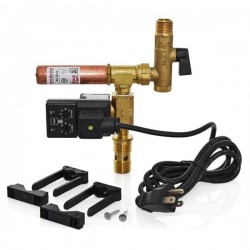
This process must be repeated as the concrete is being poured as well to ensure that there are no holes in the PEX tubing. If the concrete start to show signs of air bubbles, then you must immediately stop pouring and repair the damaged area. The system should be kept under pressure until it is ready to be installed to the heating system. The best way to do a pressure test is to purchase a manifold pressure test kit such as this one at Canarsee.